BY using zed attack proxy tool
Q1- a) what type of this script?
This is an authentication script. Scripts that are conjured when verification is performed for a Context.To be utilized, they should be chosen while designing the Script-Based Authentication Method for a Context.
b) Edit this script to take (2) argument (parameter) username and password, and run it with zap on localhost, add screen shot for each step and right description for each?
Today, when we put delicate informa
tion on the web, a greater amount of our consideration ought to be spent on the security viewpoints included. We for the most part address this in various manners, by using our own inside improvement group or by getting a group of security specialists with the essential information on the overarching system entrance strategies of the day.
The issue with numerous designers is that they by and large just have a primary comprehension of the different pertinent security angles included, which implies that you should spend noteworthy assets qualifying them to the ideal level in the event that you wish to handle your security systems in-house. Much of the time, in any case, if there is no such aptitude in the organization, it isn’t execute as a major aspect of a CI pipeline.
By the by, it is a typical event to set up and run different entrance and other testing strategies. This is generally done upon discharge; and, the more significant the discharge, the additional time and exertion spent on infiltration testing, which leaves the unavoidable chance of more issues being found during testing. After the entirety of this, there is a decision to defer the discharge and fix the issues experienced or to delay fixing so as to comply with the ideal time constraint of discharge – which will perpetually bring about an expanded likelihood of a security occurrence.
Penetration Testing Process
Pentesting typically follows these stages:
- Investigate – The analyzer endeavors to find out about the framework being tried. This incorporates attempting to figure out what programming is being used, what endpoints exist, what patches are introduced, and so forth. It additionally incorporates looking the site for concealed substance, known vulnerabilities, and different signs of shortcoming.
- Assault – The analyzer endeavors to abuse the known or suspected vulnerabilities to demonstrate they exist.
The Docker adaptations don’t expect you to introduce Java. When the establishment is finished, dispatch ZAP and read the permit terms. Snap Agree in the event that you acknowledge the terms, and ZAP will complete the process of introducing, at that point ZAP will naturally begin. At the point when you first beginning ZAP, you will be inquired as to whether you need to endure the ZAP meeting. As a matter of course, ZAP meetings are constantly recorded to circle in a HSQLDB database with a default name and area. On the off chance that you don’t persevere the meeting, those documents are erased when you leave ZAP. On the off chance that you decide to endure a meeting, the meeting data will be spared in the nearby database so you can get to it later, and you will have the option to give custom names and areas to sparing the records.
Step 1: Installation of ZAP

ZAP UX
c)print report and describe the rustle of running it?
This is a welcome screen. It has menubar, tree window, workspace window, information window, footer and toolbar
Running Pen test in ZAP
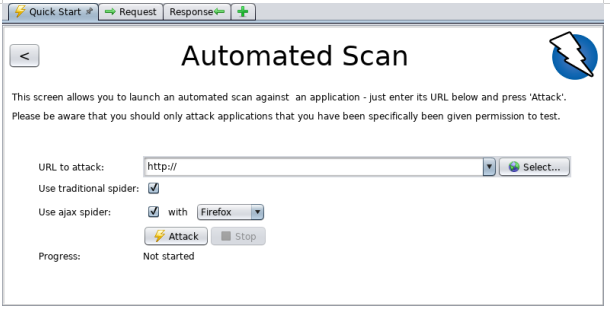
The least demanding approach to begin utilizing ZAP is by means of the Quick Start tab. Snappy Start is a ZAP add-on that is incorporated consequently when you introduced ZAP.
To run a Quick Start Automated Scan :
- Start ZAP and snap the Quick Start tab of the Workspace Window.
- Snap the enormous Automated Scan button.
- In the URL to assault content box, enter the full URL of the web application you need to assault.
- Snap the Attack
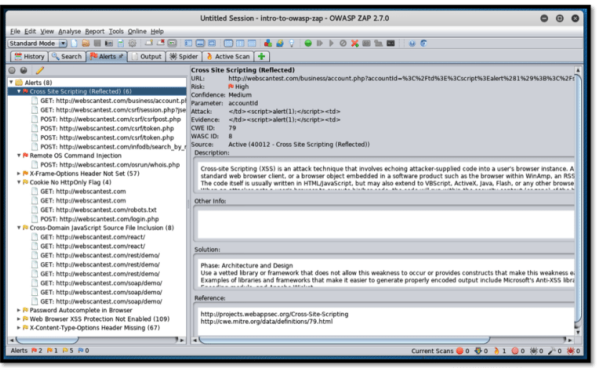
On tapping on “assault” above, ZAP advances to examine the objective site for vulnerabilities, and reports them. On the other hand, we can set up a catch on our program by tapping on the “Dispatch Browser” button under the “Assault” button. This guarantees all the sites visited by the program are checked for vulnerabilities each time they are visited. ZAP continues to examine the objective site for any vulnerabilities, and found issues are sent to the “Cautions” tab at the base window. Alarms are distinguished according to the OWASP top 10 posting of the most predominant web application vulnerabilities.
The screen below illustrate the the results of the attack
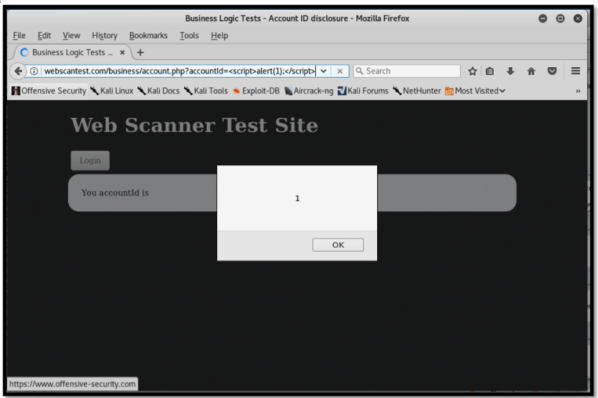
The second found powerlessness shows the inappropriate utilization of working framework orders inside the web application, permitting aggressors to mishandle these orders to peruse documents contained inside the server facilitating the web application.
Print the Report
1. Dispatch ZAP and view Web destinations history and info parameters
This activity will walk you through Launching ZAP and permit you to get settled with the GUI for ZAP inside your virtual machine. Contents that are conjured when verification is performed for a Context.To be utilized, they should be chosen while designing the Script-Based Authentication Method for a Context.
Separate your machine from the Internet when utilizing ZAP. This will guarantee you are just examining applications on your localhost. You can do this by unplugging the Internet link on your machine or in the event that you have Wireless association, you should kill your Wi-Fi. 2. Start your Virtual Machine as you would regularly by tapping the Oracle VM VirtualBox, beginning the SDEV32Bit picture and afterward signing into the machine.
3. Confirm your Firefox program has the Proxy appropriately arranged. To do this, dispatch Firefox and go to Options – > Preferences menu.
4. Snap on the Advanced symbol and select the Network tab.
5. Select the Settings fasten and afterward enter localhost for the HTTP Proxy with Port of 8080. Likewise, be certain Use this intermediary server for all conventions is chosen and the No intermediary for: textarea is clear.
6. Snap Ok and your Browser will send HTTP messages to the as of now preconfigured ZAP intermediary. Note: You should change your Browser settings back to “No intermediary” when you are prepared to perform ordinary Browsing to either the localhost or the Internet for what’s to come.
7. To Launch ZAP, open up a shell brief and change to the ZAP_2.3.1 envelope.
8. Type the accompanying order to begin ZAP: ./zap.sh
The ./characters are significant for appropriately and safely propelling projects in Linux.
In the wake of propelling the ZAP GUI will be uncovered.
9. The GUI will look confused from the outset as there is a lot of usefulness that this instrument can perform. Throughout the following couple of weeks you will be presented to the greater part of the basic highlights.
10. To utilize the Sites and History tabs, you should dispatch your Browser. Open your Browser and dispatch the DemoGetForm.html record from week 4. The URL ought to be: localhost/week4/DemoGetForm.html. On the off chance that you audit the ZAP instrument you will see the Sites Icon has recorded the GET:DemoGetForm.html document. Likewise, notice the History tab as data identified with this site.
11. In the event that you click on the Request and Response tabs on the correct site of the apparatus, you will see both the header and body of the DemoGetForm.html document.
12. You ought to painstakingly survey the solicitation and reaction subtleties noticing how much data is uncovered from this exchange. Data, for example, Web Server and Operating framework are uncovered. All HTML source code and remarks are additionally given.
13. Complete the DemoGetForm.html and notice the expansion of the get_Submit.php(fname,lname mypass) to the history and destinations tab. Likewise, notice the Request and Response tabs also the Params tab close to the base.
// Logging with the script name is super helpful!
function logger() {
print(‘[‘ + this[‘zap.script.name’] + ‘] ‘ + arguments[0]);
}
var HttpRequestHeader = Java.type(‘org.parosproxy.paros.network.HttpRequestHeader’);
var HttpHeader = Java.type(‘org.parosproxy.paros.network.HttpHeader’);
var URI = Java.type(‘org.apache.commons.httpclient.URI’);
function authenticate(helper, paramsValues, credentials) {
var token, msg, resbody = ”;
var loginApiUrl = paramsValues.get(‘API URL’);
var jsonString = paramsValues.get(‘JSON’); // ‘{“email”:”%username%”,”password”:”%password%”}’
var username = credentials.getParam(‘Username’);
var password = credentials.getParam(‘Password’);
var reqbody = jsonString.replace(‘%username%’, username).replace(‘%password%’, password);
var requri = new URI(loginApiUrl, false);
var reqheader = new HttpRequestHeader(HttpRequestHeader.POST, requri, HttpHeader.HTTP10);
reqheader.setHeader(‘Content-Type’, ‘application/json;charset=UTF-8’)
msg = helper.prepareMessage();
msg.setRequestHeader(reqheader);
msg.setRequestBody(reqbody);
logger(‘ Sending POST to ‘ + requri + ‘ with body: ‘ + reqbody);
helper.sendAndReceive(msg);
resbody = msg.getResponseBody().toString();
try {
var data = JSON.parse(resbody);
token = data[“authentication”][“token”]
org.zaproxy.zap.extension.script.ScriptVars.setGlobalVar(“target-api.token”, token)
} catch (e) {
logger(‘cant-parse-json – auth failed?’)
logger(resbody)
}
return msg;
}
function getRequiredParamsNames() {
return [‘API URL’, ‘JSON’];
};
function getOptionalParamsNames() {
return [‘TokenAttr’];
};
function getCredentialsParamsNames() {
return [‘Username’, ‘Password’];
};
Q2 a) What type is this script.
Http sender script. Script which run ‘inline’, can change each ask for and reaction and can be independently enabled.They are conjured for proxied demands and demands that start from ZAP, for instance from the dynamic scanner or arachnids.
b) Edit and run it on localhost using (ZAP) tools, and run it with zap on localhost, add screen shot for each step and right description for each?\
The HTTP sender content interferes with the calls (while doing the creepy crawly output or dynamic sweep) and alters the Request/Response headers to accomplish the verification.
The content uses the worldwide factors spared utilizing the Authentication content and includes the necessary header parts in the consequent API calls.
As appeared in the picture beneath, we have to choose the HTTP Authentication Session Management to utilize the HTTP Sender content.
Zap API
The next window is for access toke as shown below;
Use the ZAP API as shown below;
c)print report and describe the rustle of running it?
Use ZAP to block http messages and change their substance to Identify potential vulnerabilities One of the solid highlights of the ZAP instrument is the capacity to intrude on HTTP message and change the qualities trying to discover programming blemishes. Right now, will utilize the web applications and show how the information parameters sent from the structure can without much of a stretch be changed and diverted back to the application with the new parameters. To interfere with a HTTP transmission, you utilize the Break Points usefulness inside ZAP.
1. As in the past, be sure you have detached your machine from the Internet, dispatch your virtual machine and afterward start ZAP.
2. To set a Break point, right mouse click the particular site you need to Break on. For instance, in the event that we need to put a Break point for the get_Submit.php record, we would right mouse click that site, select break and afterward select spare.
3. When the Break Point is set, it will show in the Break Points tab.
4. To test the break point, dispatch the DemoGetForm.html application, complete the frame and afterward press submit. You will see the program appears to hang as the http demand has been blocked by the intermediary and is anticipating activity in ZAP.
5. You would now be able to alter the first information by right mouse clicking in the Break tab and choosing resend. When the resend outline shows up, adjust the GET string as proper and choose the send button.
6. You will at that point have the option to see the new reaction in the window.
7. To discharge the break point, you can tap on the bolts at the top which permit you to Submit and step to the following break. When you select those bolts, the information will be submitted and the program will show the outcomes. Note, you can likewise adjust the content in the break tab itself and afterward click the submit bolts to show the outcomes in your program.
This is the place the individual on the up and up investigation and revelation happens. Controlling the information sent into the applications gives understanding into the vulnerabilities of the application. For instance, you may find that sending in an invalid secret phrase permits access to the framework. You may likewise find giving an administrator username and beast power secret key estimate may give extra framework benefits.
You should try different things with the entirety of the PHP applications to perceive how parameters and data can be changed and the subsequent effect on the application.
if (typeof println == ‘undefined’) this.println = print;
// Logging with the script name is super helpful!
function logger() {
print(‘[‘ + this[‘zap.script.name’] + ‘] ‘ + arguments[0]);
}
var ExtensionHistory = Java.type(‘org.parosproxy.paros.extension.history.ExtensionHistory’);
var Control = Java.type(‘org.parosproxy.paros.control.Control’);
var Model = Java.type(‘org.parosproxy.paros.model.Model’);
var History = Control.getSingleton().getExtensionLoader().getExtension(ExtensionHistory.class)
function sendingRequest(msg, initiator, helper) {}
function responseReceived(msg, initiator, helper) {
var historyRef = msg.getHistoryRef();
var msgid = History.getLastHistoryId() + 1;
if (historyRef !== null) {
msgid = historyRef.getHistoryId();
}
var header = msg.getResponseHeader();
header.addHeader(‘X-Zap-Msgid’, ” + msgid);